10,000 Memories
Pattern by Bob Crochets
Materials Required
- Crochet Hook (I use a 4.0mm G Hook)
- Yarn for motifs (<2m per motif)
- Yarn for joining and border
Motif Instructions
If you are familiar with granny squares, this is just a one-round version--very simple. Ch 5, sl st tog. Ch 3 (this counts as your first dc), in loop 2dc, ch 2, *3 dc, ch 2* 3 times. Join at top of Ch 3. Weave in ends.
 |
| A whole lot of motifs ready to be joined. |
Joining Your Afghan
A few notes before starting:
- I find it quite helpful to look at each square as having four sides of a "1-3-1 pattern." There's 1 chain, 3 double crochets, and 1 more chain on each side of the motif.
- You'll be joining this blanket in a step pattern from right to left as you move upward. I find that it helps to keep this in mind as you read through the directions and join your work.
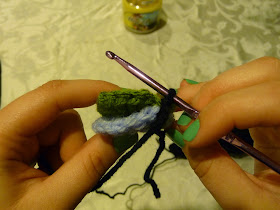
Take two motifs, right sides facing eachother. Put hook through both loops of motifs' first chain stitches in the 1-3-1 pattern [Image 1]. Attach joining color [Image 2].
 |
| Image 1: Hook in first two loops of motifs. |
 |
| Image 2: Attach joining color to motifs. |
Step Two
Slip stitch in first chain space of 1-3-1 pattern. (When starting a new row, this will be the same stitch where you attach your joining color to your work.)
Step Three
In back loops only, slip stitch in the side's three double crochets [Image 3].
 |
| Image 3: Hook in back loops of DC only. |
Image 3: Hook in back loops of DC only.
Step Four
In both loops of next Ch 1 stitch, slip stitch [Image 4].
 |
| Image 4: Hook in both loops of chain stitch. |
Step Five
Pick up another motif and place it right-side facing down/in where the next "step" of the stairs should be [Image 5]. To join, repeat Steps 1-4 [Image 6].
 |
| Image 5: Placement of next motif. |
 |
| Image 6: Step One demonstrated on next motif. |
Step Six
Repeat Steps 1-5 until you reach the end of the row. You will be joining up the right side of a square, then across the top of it, then up the right side of the next square, and then over the top of it, always moving from bottom right to top left until you reach the end of the row. You'll be performing Steps 2-5 twice for each square--once going up and once going across--except for when you join to the first and last squares of each row. See Step Nine for more detailed photographs.
Step Seven
When you reach the end of a row, chain 1, cut joining color, and pull end through loop [Image 7].
 |
| Image 7: Chain 1 before cutting and pulling joining color through. |
Optional: I like to begin crocheting my borders as I go. I find that it helps me manage all the yarn tails and allows me for the blanket to have much more strength as I work. If you decide to do this, single crochet up the straight (left) side of the blanket--five stitches per square--as you work each row. This process goes slowly, but I find it to be quite worthwhile.
Step Nine
Repeat Steps 1-8 until your blanket has reached your desired length. You will have a staircase of stairs instead of a square afghan. To square everything off, continue adding rows to the afghan via Steps 1-8, but make sure to start on top of the previous row's rightmost square instead of to its right. Also make sure to only crochet up to the desired height of your afghan or it will keep getting taller. See photographs below for additional information.
 |
| Front Side of afghan before "squaring up." |
 |
| Back Side of afghan before "squaring up." |
 |
| Close-up image of afghan's back side. It has an amazing texture! |
Squaring Off Your Afghan
Below you will find more information about squaring off and completing your afghan. Each image below will walk you through the process, but if you need further information, please ask!
Placement of all squares before "squaring off":

Step 4 on third row, second square of afghan as you join over the top of last row's squares.
Step 2 on third row, second square of afghan as you join over the left-hand side of your square.
Step 1 on "Row 4," square one. Note that this row begins the "squaring off" process by starting on the top of the last row completed instead of to the right.
A finished piece that has been completely squared and tied off.
Step Ten
If you did not follow Step Eight, single crochet around the afghan. Add desired edging and you're done! (I prefer to use a simple double crochet border as shown below, but there are a lot of edging options that would look nice.)
 | |
| Finished piece with a single crochet border. |
 |
| My preferred edging method, as noted above. |
Contact Information
If you have any questions about this pattern, find errors, or would simply like to contact me, please feel free to leave a comment below.


This comment has been removed by a blog administrator.
ReplyDeleteThis comment has been removed by a blog administrator.
ReplyDelete